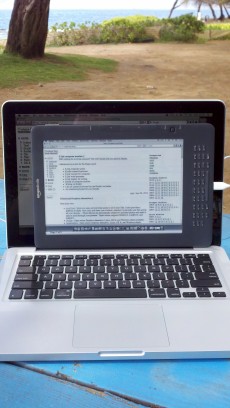
tinyapps.org / docs / Kindle DX as E Ink computer monitor

Warning
Note that in some jurisdictions, it may actually be illegal to jailbreak your tablet (but not a phone!).
These directions are current as of March 2012 and worked well for me. They may not work for you, and might even destroy your Kindle. At the very least, they definitely void your warranty. Proceed at your own risk (and joy).
Environment
- Kindle DX Graphite (DXG) running 2.5.5
- Mac OS X 10.6.8 & Vine Server 3.0 (though most any OS and VNC server should work)
Procedure
1. Jailbreak
- On Mac: Download NiLuJe's JailBreak and UsbNet.
- On Mac: Extract the appropriate bin from kindle-jailbreak-0.10.N.zip (e.g., update_jailbreak_0.10.N_dxg_install.bin) to the USB storage root of your Kindle.
- On Kindle: Press Menu, choose Settings, press Menu again and choose Update Your Kindle. The Kindle will reboot.
- On Mac: Extract the appropriate bin from kindle-usbnetwork-0.37.N.zip (e.g., update_usbnetwork_0.37.N_dxg_install.bin) to the USB storage root of your Kindle.
- On Kindle: Repeat step 1c.
2. Setup VNC
- On Mac: Download hawhill's Kindle VNC viewer and copy the kindlevncviewer directory to the USB storage root of your Kindle.
- On Mac: Download and install Vine Server (OSXvnc). Set authentication to "none" and RFB Protocol to "3.3".
- On Kindle: Rotate display (using AA) to desired orientation (portrait or landscape).
3. Connect
- On Kindle, from the Home Screen:
- Press Del, type ;debugOn and press Return*
- Press Del, type `usbNetwork and press Return†
- Press Del, type ;debugOff and press Return
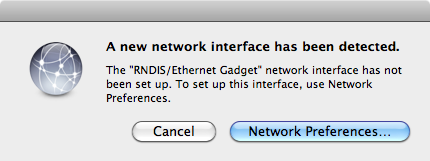
- On Mac: Connect the Kindle's USB cable. The following dialog box will appear:

Click "Network Preferences..." and configure IPv4 manually (IP Address: 192.168.2.1, Subnet Mask: 255.255.255.0)
- On Mac: Issue the following 4 commands:
$ telnet 192.168.2.2
Trying 192.168.2.2...
Connected to 192.168.2.2.
Escape character is '^]'.

Welcome to Kindle!

#################################################
#  N O T I C E  *  N O T I C E  *  N O T I C E  #
#################################################
Rootfs is mounted read-only. Invoke mntroot rw to
switch back to a writable rootfs.
#################################################
[root@kindle root]# /etc/init.d/netwatchd stop
system: I netwatchd:def:stopping Netwatch Daemon
[root@kindle root]# /etc/init.d/powerd stop
Stopping Power Management Daemon: [root@kindle root]# /mnt/us/kindlevncviewer/kvncviewer.sh 192.168.2.1:1 &
4. Disconnect
- On Mac: To end, press
Ctrl+C and then [root@kindle root]# killall kindlevncviewer . Restart netwatchd and powerd if desired.
- On Kindle: To return to USB mass storage device mode, repeat steps 3.a.i-iii or simply restart (Home Screen > Menu > Settings > Menu > Restart).
5. Notes
- * Don't confuse the Return key, which looks something like ⏎, with the center button of the 5-way controller (as I did)
- † The backtick (`) is used in Kindle Version 2.x and earlier; the tilde (~) in Kindle Version 3 and later.
- Optimize Mac OS X settings:
- Safari > Preferences > Advanced > check "Press Tab to highlight each item on a webpage"
- System Preferences > Universal Access > Seeing > check "Use grayscale"
- Dig into some of the more obscure keyboard shortcuts like Ctrl+F2 (activate menu bar) and Ctrl+F3 (activate Dock)
More Info & Updates
created: 2012.03.31, updated: 2018.05.17

